We have been continuously taught how to compose a proper photograph. We are given guidelines and rules to live by when taking our photos. Now you want me to forget those? Not quite.
Breaking the rules of photography sounds incredibly easy but in fact it is extremely difficult. You still have to think about the rules and how you can 'adjust' or 'tweak' them to make them break the rules. This became a challenge for me and took multiple tries to get an image that is still beautiful yet breaks the rule of composition.
Here are a couple that I am proud to present:
Taken with a nikon D3000, 1/125 Shutter Speed and f/5.6 Aperature.
Taken with a nikon D3000, 1/8 Shutter Speed and f/4.5 Aperture.
Taken with a nikon D3000, 1/10 Shutter Speed and f/5.6 Aperture.
Friday, 23 December 2011
Thursday, 22 December 2011
Silk Screening Laptop Case
For my third medium I chose to use the silk screening method.
Steps for prepping a screen:
I started by selecting the image I wanted to use. My picture was a simple design of a chair I photographed in the corner of cement walls. I then transfered it to an acetate, allowing the sections that would be white to be clear and the blacks remain black.
The next step was to prep the screen. I took a large wooden screen and stretched and stapeled thin fabric onto it. This can be tricky because it would be very tight. You then take the screen and apply emulsion to it. With this step it is crucial that you apply the thinest layer you can.
Once the screen is evenly covered you place the screen in a dark cupboard or room for two days. In my case I placed it inside a cupboard. This allows for plenty drying time.
After two days you take the screen and acetate and place both on the light desk. This will expose the screen burning the image into the screen. I recommend 12 minutes for the exposure.
Next comes the tedious step. Washing. I spent a total of 40 minutes washing my screen, to ensure that it had been thoroughly washed, as you cannot wash once the screen has been used. After the screen has been washed it is ready to use!
 Using the screen:
My first step was to tape the paper down onto the desk so that it wouldn't move while screening.
My screen has two screenings that can be done on top of one another to create a picture with more depth, so I did the first screening, followed by the second screening.
This was the final result:
To make the screen into a product I decided to put it onto a laptop case. I repeated all of the steps above with an adjustment in the colour choice. I feel that the result really enhances the look of the laptop case giving it a lot more interest.
Some of the challenges I found whilst completing this process were difficulties in washing the screen after the exposure to light, lining up the two screenings (can be really challenging to get them to line up perfectly) and making sure the laptop case didn't move or smudge whilst screening.
Overall I enjoyed this alternative process and will continue to do many more silk screenings in the future.
Steps for prepping a screen:
I started by selecting the image I wanted to use. My picture was a simple design of a chair I photographed in the corner of cement walls. I then transfered it to an acetate, allowing the sections that would be white to be clear and the blacks remain black.
The next step was to prep the screen. I took a large wooden screen and stretched and stapeled thin fabric onto it. This can be tricky because it would be very tight. You then take the screen and apply emulsion to it. With this step it is crucial that you apply the thinest layer you can.
Once the screen is evenly covered you place the screen in a dark cupboard or room for two days. In my case I placed it inside a cupboard. This allows for plenty drying time.
After two days you take the screen and acetate and place both on the light desk. This will expose the screen burning the image into the screen. I recommend 12 minutes for the exposure.
Next comes the tedious step. Washing. I spent a total of 40 minutes washing my screen, to ensure that it had been thoroughly washed, as you cannot wash once the screen has been used. After the screen has been washed it is ready to use!
 Using the screen:
My first step was to tape the paper down onto the desk so that it wouldn't move while screening.
My screen has two screenings that can be done on top of one another to create a picture with more depth, so I did the first screening, followed by the second screening.
This was the final result:
To make the screen into a product I decided to put it onto a laptop case. I repeated all of the steps above with an adjustment in the colour choice. I feel that the result really enhances the look of the laptop case giving it a lot more interest.
Some of the challenges I found whilst completing this process were difficulties in washing the screen after the exposure to light, lining up the two screenings (can be really challenging to get them to line up perfectly) and making sure the laptop case didn't move or smudge whilst screening.
Overall I enjoyed this alternative process and will continue to do many more silk screenings in the future.
Monday, 12 December 2011
Double Exposure? No... TRIPLE EXPOSURE
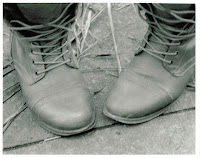
When flipping through my negatives from my trip to Toronto, mentioned in the last post, I came across this photo of a pair of boots:

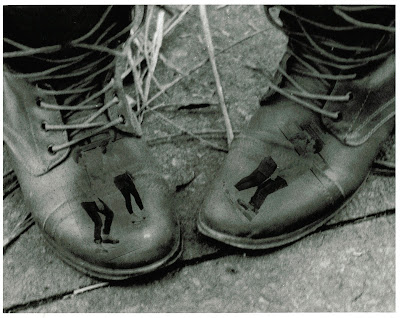
It led to me thinking about how I had been taught a double exposure. Then that thought spinning in my head ended it up with me doing a triple exposure, thinking it would be absolutely awesome if I put a similar image on each boot. So I remembered I had taken a couple pictures of a couple skating.
I did test strips to find a good exposure time for the two images of the skaters, and then found a good time for the boots.
I then burned and dodged the spots where the photos would go, switching between three enlargers. (Not an easy task!) This was frustrating at times as one wrong move, like laying the paper down slightly out of line would wreck the entire composition.
After numerous times of exposing and developing, finding the right times and placements, I came up with a composition I am truly proud of:
The Adventures of Creating a Cyanotype
When I was introduced to the idea of a blue photograph which is developed by the sun, my mind was immediately triggered. I thought this is amazing. So I started on a mission to find a good picture to use for such a unique process. I couldn't make up my mind. I ended up choosing two photos I took on a trip to Nathan Phillips Square in Toronto on Nov 25th. The first one was of a antique Harley Davidson headlight and the other of my classmates in Graffiti Alley.
Once I had the photos selected, I was able to start the process of developing a cyanotype. I started by mixing equal parts Ammonium Iron Citrate and Potassium Ferricyanide. When the solution was mixed, I used a paint brush to spread the liquid over the sheets of watercolour paper. (This ends up looking bright green.)
While waiting for the solution to dry, I scanned my original photographs, which I developed in the dark room, and on the computer inverted the colours to create a negative from the positives.
After waiting 20-40 minutes to allow the cyanotype fluid to dry, I was
able to place my acetates on top. These to sheets get sandwiched by two plexiglass.
Now it was ready to expose! Unfortunately I did not have very good weather the first time I tried this, so the image did not appear, even though I left it to be exposed for a very long time. So I tried again the next day. Same weather, same results. And same the following day. By the fourth time trying I found this to be very irritating and wondering why I am putting myself through this. But I continued. The weather was great that day! Nice and sunny. The cyanotypes came out quite beautiful but I was still not content with the end result as they started to fade quickly.
With decent results I told myself, try it one more time. The next day was the same beautiful weather so I did the process all over again. The results were amazing this day! This is what the final result was for each of them:
I think that there was one cliche line that was really proven to me the week that I spent working on this medium. "With persistence comes great results". There were points where I was looking down the list thinking of the other mediums I could select, to replace this medium. But I am glad I continued through with it, and now it is one of my favourite processes!
 |
| Inverted Image Used on Cyanotype |
While waiting for the solution to dry, I scanned my original photographs, which I developed in the dark room, and on the computer inverted the colours to create a negative from the positives.
After waiting 20-40 minutes to allow the cyanotype fluid to dry, I was
able to place my acetates on top. These to sheets get sandwiched by two plexiglass.
 |
| Inverted Image Used on Cyanotype |
With decent results I told myself, try it one more time. The next day was the same beautiful weather so I did the process all over again. The results were amazing this day! This is what the final result was for each of them:
 | |
|
 |
| Canon 35mm Film Camera |
I think that there was one cliche line that was really proven to me the week that I spent working on this medium. "With persistence comes great results". There were points where I was looking down the list thinking of the other mediums I could select, to replace this medium. But I am glad I continued through with it, and now it is one of my favourite processes!
Subscribe to:
Comments (Atom)


